Holly King Yoga

Holly King Yoga
Holly King is a yoga instructor and learning & behavior specialist based in Rowayton, Connecticut. Since beginning her love affair with yoga while living in Sydney's northern beaches, her journey has taken her through Chicago and Fairfield County. By unifying her background in education with her yoga philosophy, Holly teaches a student-centered, alignment-based vinyasa class, pulling inspiration from her many teachers, the yoga sutras, and other inspirational texts. In addition to teaching yoga, Holly is a certified special education teacher, currently using her degree to teach creative, play-based educational classes as well as tutoring. Holly loves to spend time with her dog, read, and travel.

Saturday, February 15, 2014

Raw Vegan Almond Butter, Coconut & Chocolate Bark

Its Valentine's weekend. This separates the world into two kinds of people. There are those who are attached. That means a weekend of romance, flowers, dates, pressure to accomplish the first three on this list or possibly suffer a fight. Then there are those who are single. The movies make this seem like a sad time for those who are unattached and maybe some are, but from what I see of those around me, its time for friendship, parties, and a celebration of your relationship with yourself. There is one thing that unites both ends of the spectrum on Valentine's Day and thats CHOCOLATE. Whether you get a box from your date, your mom, steal some out of your child's Valentine's bag, or buy it for yourself- Valentine's day is an excuse to indulge in chocoholism.

Then there are people like me. As a vegan, I can't have most commercial chocolate, certainly none that can be found at the grocery store. Because I know how to read labels properly, I can find one or two bars at Whole Foods that don't contain dairy but Simon is terrified to buy me any food other than an apple in fear it will contain dairy or egg under a secretive name. So I decided to make my own chocolate this Valentine's Day...

Raw Vegan Almond Butter, Coconut & Chocolate Bark


Ingredients:
2/3 cup Cocao powder
1/2 cup Coconut Oil
1/3 cup Shredded Unsweetened Raw Coconut 
5 tablespoons Maple Syrup
3/4 Cup Almond Butter (approximate)

1. Mix first 4 ingredients.
2. Line 8x8 pan with parchment paper. Pour half chocolate mixture into the pan.
3. Freeze for 20 minutes or until hardened.
4. Spread almond butter over chocolate.
5. Pour remaining chocolate over almond butter.
6. Freeze for 1 hour.
7. Break into pieces and eat!

A few notes:
1. Keep refrigerated or the chocolate will soften and be very messy
2. Not all almond butter is raw, if you care about this- read the label or grind your own at the store or at home- my juicer has a nut butter setting, maybe yours does too!
3. Use 100% maple syrup, the other stuff is filled with artificial ingredients
4. cocao powder is expensive but will last a long time, amazon.com is probably the cheapest place to get it

This stuff is SO GOOD. Its rich too, so you don't need a lot to be satisfied :)

Friday, February 14, 2014

Practicing Satya Does Not License You to be an A--hole

I've been talking a lot this week about honesty, or the yama of "satya". Yoga encourages us to "speak our truth". Not every truth is sunshine and rainbows. Its not supposed to be that way. But how many times have you heard a negative person say something rude and follow it up with, "I'm not a b--ch, I'm just honest". Well yeah, you are honest- but you're also a b--ch. Practicing satya does not license you to be an a--hole.

While delivering truth, its important to practice "ahimsa" or non-violence. This requires you to deliver your truth gently. A simple example, rather than telling your sister "You look fat in that shirt", you can opt for a kinder "I think you'd look nicer in your red sweater". Easy peasy, you were honest and you didn't hurt your sister's feelings.

Observing sutra 2.36 "To one established in truthfulness, actions and their results become subservient", Sri Swami Satchidananda says: "If by being honest we will cause trouble, difficulty or harm to anyone, we should keep quiet." Does that sound familiar? I believe Thumper's mother said it much more simply "If you don't have anything nice to say, don't say anything at all."

Lets backtrack, because you shouldn't spend your whole life silent, holding back your violent and negative thoughts. Start at the beginning. Drop the negative thoughts. If something doesn't serve you- LET IT GO. Anger and cynicism won't improve your life. If somebody is effecting your life negatively, reevaluate your relationship with that person. Rather than going home and expressing your angry thoughts of them, reduce the amount of time you spend with them or stop seeing them altogether. If that's not possible, listen to them speak but don't let their attitude effect you, creating anger. Don't let them get to you and bring negativity into your fantastic life. If you cut out the negative thoughts, you have no reason to keep anything to yourself- you can live honestly and speak your truth while practicing ahimsa.

That's difficult and takes practice. It also takes presence. The easiest way to let something go is to jump out of the past and live in the moment. How can something bother you if its over and you're fully focused on your present activity?

The take home message here is: Be honest, but have a kind heart. If you act authentically and from a kind place, you can't go wrong.

Thursday, February 13, 2014

Honesty & Shoulder Stand

Like most people, I dislike conflict. I don't even like to tell people that they're wrong. I will go along with some fake truth that somebody else believes until I have myself so far down the wrong path that I have no idea how to continue. In 7th grade, somehow my biology teacher got the idea that my mom grew up on a Danish farm. I promise you that I never told her this. My mom is of Danish descent and lived on a hobby farm for a short time as an adult, but this is far from what the teacher imagined. She asked me if I grew up speaking Danish, had I visited my mother's homeland, did she speak English well, tell her about the farm. I really didn't want to tell my teacher that she had the wrong impression, so I went along with it. I let her believe something 100% untrue just so that she wouldn't feel stupid for a millisecond, if at all, had I corrected her immediately. This isn't uncommon for me. Up until recently, I'd go along with anything somebody believed to save them the embarrassment of being wrong. I only let my husband be wrong ;)

These lies are all white, nobody got hurt, and most likely they didn't effect anybody's lives other than having a few incorrect facts. This still holds me back from speaking my truth and being 100% authentic. One of the eight limbs of yoga is the Yamas and Niyamas. Put simply, these are rules on how to live and not to live. One of the yamas is "satya", or truth. We should live our lives being true to who we are, honest about our thoughts and actions, and forthright with our intentions.

This can be hard, sometimes its hard to discover exactly how to feel or which path you really want to take. You've spent so much time conforming your opinions, hiding your authentic personality, and stifling your urges that its hard to let that guard down. It can be scary to soften your heart and let people know exactly who you are. It can be even scarier to be honest with yourself about who you really are. So many people try to be a shiny, pretty version or an alternative, rebellious version of themselves. They put up the act for so long that they begin to believe it. They can't figure out why they're so unhappy; its because they aren't being honest with themselves about who they truly are. As a 20-something, I'm at the turning point of figuring out who I am or stifling it and living an unhappy adulthood. I see a lot of people who don't figure out who they really are until they're 50 or 60 or never. Sometimes you meet a 15 year old who's already figured it out. Stop living unhappily because you haven't started living the life you love. Start letting your guard down today. Follow your impulses, speak what is true, stand up for what you believe in, and have some FUN. Find joy throughout your day because you are being yourself.

For today's tutorial we have shoulder stand, which activates your Ajna or third eye chakra and vishuddha or throat chakra. Both are essential to truthfulness. A balanced ajna chakra keeps you calm and focused, able to follow your path. A balanced vishuddha chakra allows proper intuition and communication, you can speak your truth.

Shoulder Stand / Sarvangasana

Begin lying on your back, arms at your sides and palms face down. Lift your legs perpendicular to the ground. Engage your core and press your hands into the floor to lift your hips off the ground and place your hands on your low back to urge your whole upper body perpendicular. Walk your elbows close to one another for stability. Lengthen your neck to allow space in your throat for breathing. The ideal is for your feet to stack over your hips, hips stacking over your shoulders. Breath deeply through the nose in this pose for as long as you can hold it. Recommended is 3-5 minutes, advanced is 15 minutes.

Supported Shoulder Stand

Lay on the floor with your legs resting against the wall. Bend your knees, placing the soles of your feet into the wall and press through your feet to lift your hips. Take your hands to your low back, elbows in close for stability. Either stay here or try taking one or both feet off the wall, straightening your legs and stacking feet over hips, hips over shoulders. Hold for as long as feels good.

This is a great way to end your practice before entering savasana. Its a more accessible inversion for those of you who see no need or are not ready for headstand quite yet.

Tuesday, February 11, 2014

Sunshine in a Jar

February can be brutal. By now, those of us closer to the poles than the equators who don't ski have been stuck inside for months. We haven't seen the sun longer than the amount of time it takes to sprint from the car to whatever indoor establishment you're forced to leave your house for. The exciting snow storms of December have become nothing but a hassle. Too many school days and yoga class have been cancelled and our backs hurt from shoveling. We are all out of TV shows worth weekend marathons and running on a treadmill makes us yearn for our warm weather trails. Most of us can use a little cheering up. Enter, a delicious, vitamin-rich homemade juice.

Sunshine in a Jar
(makes one medium juice)


Ingredients:
1/3 Grapefruit, peeled
1 Cara Cara Orange, peeled (or your preferred orange- Cara Cara are my #1 favorite)
1 Green Apple, seeded
3 Carrots
1/2 Cucumber

Wash your ingredients and put them in your juicer. Then drink.

Health Benefits:
  • Beta-carotene and lutein protect your retinas for healthy night vision
  • Vitamin A promotes lung health, can reduce the risk of emphysema for smokers
  • Lowers insulin, helping, convert sugar to insulin rather than storing as fat
  • Salicylic acid helps break down calcium build up in the joints, preventing arthritis
  • Vitamin C helps reduce respiratory conditions such as asthma
These are just a few of the hundreds of benefits I've found from the ingredients of this juice, besides its great taste.


*I'm not a doctor or a nutritionist. The information I provide is based on research from outside sources.

Thursday, February 6, 2014

The 3rd Grade Spelling Bee and Downward Facing Dog

When my brother Wesley and I were kids, my mom would enter us in the local spelling bee at Morraine Valley Community College in Palos Hills. I loved the spelling bee. I was the kind of kid who got to color or play "MASH" during the spelling post-test because I aced the pre-test. I vividly remember sitting with on my mom's bed with her, holding a dictionary while she quizzed my brother and I on words to prepare for the spelling bee (we have an awesome mom who has always put more emphasis on spending time with us than anything else in the world). With me, she would practice more difficult words that might appear in the later rounds, thinking I'd get the easy ones with no problem. All I remember of my brother is practicing the word "library" because he pronounced it "li-berry". When the spelling bee arrived, we both felt prepared. I made it through the first couple rounds with no problems. Fairly early in the competition, I got the word "canyon" and  confidently walked up to the podium spelling "C-A-N-I-O-N" like "onion". I was so focused on the more difficult words that I completely missed a word that simple phonics could have sounded out for me.

Why am I telling you about my childhood spelling bee defeat in my yoga blog? FOUNDATION. If I would have focused on the foundations of spelling, rather than immediately focusing on tricky words and exceptions, I would have been much better off. The same goes with yoga. Learn proper alignment in basic poses and the muscle memory will help poses that require additional balance, flexibility, and strength come  (more) easily. So where are we starting? 

Downward Facing Dog aka Down Dog aka Adho Mukha Svanasana
In a vinyasa yoga class, you will enter more down dogs than any other pose. Its a "resting pose", but it doesn't always feel that way. Down dog is mainly used after a "vinyasa" (I'll explain in a later blog) to reset the body in between "mini sequences" (short sets of choreographed poses to open, strengthen, and/or create heat, a vinyasa class is made up of several mini sequences). It is also used at the beginning of class to start opening the joints and muscles. I see this pose improperly executed in many classes, sometimes by people who fancy themselves advanced yogis. Just like the spelling bee, start with a strong foundation and you'll be more prepared for everything that comes after. Unless you take a beginners class (and you should!), your teacher may not have time to fully explain this pose.

1. Begin in plank pose: Hands shoulder distance apart with the fingers spread to a comfortable distance, middle or index finger pointing to the front of the room (you'll hear both, go with what is more comfortable for you). Hands are placed directly under the shoulders, which are externally rotated; turn the eyes of the elbows forward, triceps back. Press into the mat with the base knuckles of your index finger and thumb.  Engage all ten finger tips. Shoulder blades soften down the back. 

2.Toes tuck under with the feet hip distance from one another. Spine is neutral and long, as much space as possible between the crown of the head and the soles of your feet, gaze between the thumbs.


3. Keep your hands and feet exactly where they are. Fight the urge to walk your hands in. Lift the hips up and back, gently melting the chest toward you thighs. Keep the external rotation of your shoulders and relax them away from your ears, blades melting down your back. Bend your knees slightly and internally rotate your hips, gently "pigeon toe-ing" your feet; you should not be able to see your heels. Keep the ribs tucked in and a long straight spine. Your low back with naturally want to round to go "deeper" into the pose, avoid this by lifting the sits bones higher and and even further from your shoulders, almost creating an arch in the low back. Gaze between your heels. Relax your calves, lowering your heels toward the mat. Its okay if your heels don't touch the mat- I practice daily and mine usually don't touch until the end of class, if at all.


Its a lot to think about for a "resting pose". Keep doing it right and your body will memorize the form. Keeping your arms in proper alignment will help you nail your handstand later in your practice. Proper alignment of the hips will open them for deeper stretches. Proper alignment through the legs will help you with every standing pose. Be patient with yourself. The basics are important.

Modifications: 
  • If you're new to yoga, this might be a lot on your wrists. Thats why we press through the knuckles and finger tips. That will immediately remove some pressure. If that isn't enough, move to a wall, use the exact alignment with your hands placed on the wall. Next, move back to the mat and place your hands on blocks, putting more weight into your lower body.
  • If you have very tight hips or hamstrings, keeping the proper alignment of the low back and hips will be more difficult for you. Rather than sacrificing form, bend your knees more. Bend them a lot if you need to. Its better to keep the alignment than have straight legs.


Are you wondering how Wesley did in the spelling bee? He did end up getting the word "library". He was so determined to remember that first "R" that he spelled "L-I-B-R-A-Y", as in "li-bray". We still laugh about it and occasionally pronounce it "li-bray" at my moms house.

Tuesday, February 4, 2014

Hip Opening & Surrender

My life's intention is presence. Taking a slight spin on that, my intention this week has been surrender. Sometimes surrender is looked at as giving up, it's a weakness. I disagree. Giving up is giving up, surrender is fully accepting your life situation. The more quickly we surrender and accept our life situations, the more quickly we will find joy.

This applies to our whole lives. Big things- surrendering to the fact that your career choice may not lead you to riches, once that is accepted- you can find happiness in the joys of your career, that you've stayed true to what is important to you, and that you still find a way to house, clothe, and feed your family. Surrender to the loss of a loved one, when you fully accept, you can find joy in your memories of that person, your continued love for them, and the ability to pass on the knowledge they instilled in you. Surrender to the big happinesses in life. When you take a beautiful hike and reach a gorgeous view, surrender to the moment. Stop judging, stop saying "I can't wait to come back here". YOU ARE HERE. Enjoy. Take it all in, using all of your senses. Surrender to time spent with your spouse, your children, your parents, your friends. When you fully surrender to the moment, you'll enjoy and appreciate them. You'll create stronger bonds and deepen your relationships.

Surrender on the small scale too. Surrender to traffic. Surrender to waking up at 5:00am. Surrender to eating healthy. Surrender to eating cake! Surrender to laziness and business. Surrender to the long line at the grocery store. Surrender to the joy of your team winning the Super Bowl or that your team didn't make it. When we surrender on the small scale, we create room for joy, celebration, or simply peace.

Take it to your mat. Surrender to holding warrior II for 10 breaths. Surrender to the fact that you still can't hold handstand or the joy of finally getting it. Surrender in pigeon pose. Especially pigeon pose.

Practice surrender on your mat this week. A great way to do this is through hip opening. Opening any tight joint will require surrender. Finally loosening those muscles, sending your breathe there to help break down any staleness. Get comfortable with being uncomfortable. Surrender to it. Hip openers also force you to surrender to emotion. Do you ever feel angry, scared, sad, or anxious in pigeon pose? You're opening your psoas muscle, which can trigger your fight/flight response. Until that muscle begins to loosen up and relax, you'll encounter this emotion. Surrender to it. Any emotion that arrises, take a deep breathe and fully accept it.

Here are some great poses for surrender, hold each for at least one minute taking deep, full breaths in and out through your nose:

Pigeon Pose / Eka Pada Rajakapotasana


Begin in downward facing dog. Lift one leg for three-legged dog. Bring the lifted leg forward with your hip externally rotated, so that your knee is wider than your hip and toes toward the wrist of your opposite hand. Lower your shin and then hips to the mat. Untuck the back toes and internally rotate the back hip so that the top of your back leg and foot are flat to the floor, all the way to your pinky toe. Hips are square, like 9 & 3 on a clock. The ideal is for your front shin to be parallel with the front of your mat. This isn't necessary or even attainable for a lot of people. Once your lower body is set up, place your hands wider than shoulder distance and extend the upper body tall. Lead with your chest and walk your hands toward the front of the mat. Once you've made your upperbody as long as possible, surrender into the stretch. Place your forehead on the mat, a block, a folded up blanket, whatever. Relax your shoulders and jaw. Repeat with the opposite leg.

Modify: Place an evenly rolled up blanket under your hips if they do not reach the floor beneath you.


Squat / Malasana

Begin in tadasana (mountain pose). Heel-toe your feet approximately mat distance. If your hips don't like to open this way (like mine), turn your toes out to a 45 degree angle. Lower to a forward fold, then bend your knees lowering your hips. Keep your heels on the mat and lift your upper body, crown of the head extending toward the ceiling and chest forward. Elbows come to your inner knees helping the external rotation of your hips, shoulders relax. Maybe take your hands to heart center. Relax your glutes and quads. Surrender to the pose. Or surrender to the fact that this pose requires you to pet your dog.

Modify: Place an evenly rolled up blanket under your heels or sit on a block.


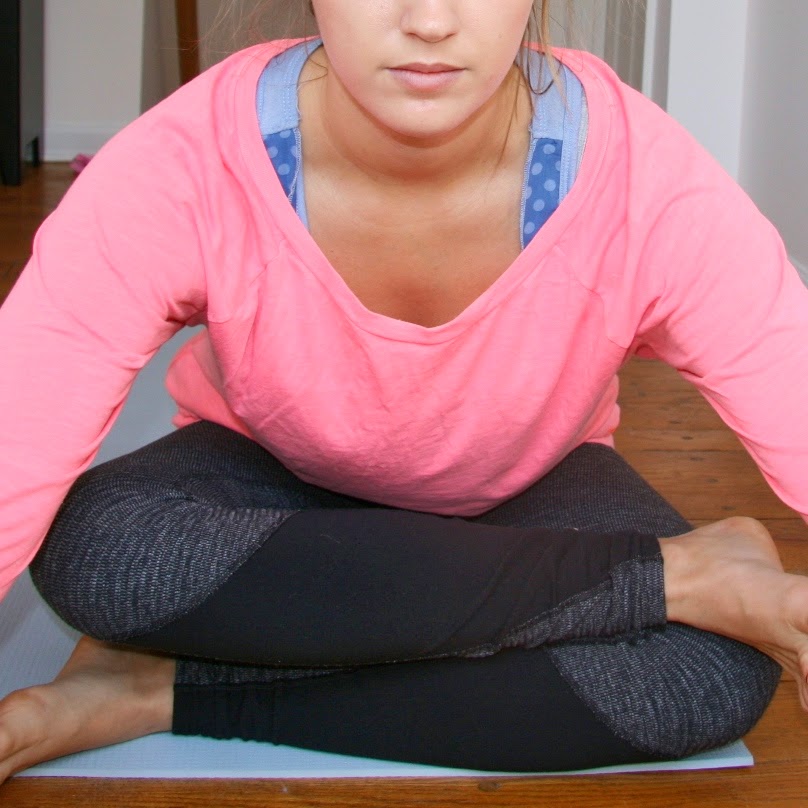
 Fire Log Pose / Agnistambhasana

Begin in an easy seated position directly on the middle of your sits bones. No hunching of the back, sit on an evenly folded blanket if this is difficult for you. Place one shin on top of the other, totally parallel. Its okay if your top leg doesn't lay flush to your bottom. Feet past the opposite knee. Flex your feet and sit up tall. Place your hands on the mat in front of you, lead with the chest as you walk your hands forward. Repeat with the opposite leg on top.

Modify: Sit on an evenly folded up blanket or a block.


Reclined Bound Angle Pose / Supta Baddha Konasana

My all-time favorite pose. Place the soles of your feet together, knees wide. Lay on your back with your palms facing up and relax your entire body. Close your eyes and easily find surrender.

Modify: Place blocks underneath your knees.


Make this your intention this week. Surrender to each breath, each experience, each pose, each success, and each failure. Maybe surrender to the idea that you just created a blog with pictures and didn't bother to brush your hair first :)

Saturday, February 1, 2014

Purple Drink

Well, here we are- day one of my venture back into plant-based eating. To celebrate, Simon and I went to Candle 79 in NYC. He isn't delving into veganism with me, but he is supportive- especially since I've agreed to take one day per week off.


One of the great things I've discovered since journeying into a healthy lifestyle is homemade juice. I typically go with a green juice, but sometimes I have a little fun and try new things. Here is a recipe for the juice I made yesterday:

Purple Drink (Makes one extra large or two medium juices)
1 blood orange (peeled)
1 cup watermelon
1/4 head purple cabbage
1 green apple
1 small beet (with greens)
1 inch ginger

This juice was nice and just sweet enough. Honestly- it has more sugar than the green juices I usually stick with, but its okay to have some fun, especially if you're reducing your processed sugar intake.

Health benefits of this juice include:
  • Potassium helps regulate blood pressure
  • High in antioxidants
  • Balances oxygen use to help the body respond better to exercise
  • Vitamin C aids the body in absorbing Calcium
  • Reduces inflammation
  • Alkalizes to help balance body's pH
  • Clears mirocirculatory channels including stuffy noses
  • SO MANY MORE- I've mentioned about 1/10th of the information from the small amount of research I've done
Note: I have a cold-press (masticating) juicer, so I get tons of juice out of my produce. If you have a centrifugal juicer, you'll get less. Please be aware of this when figuring out your portions. If you are in the market for a juicer, I suggest a cold-press. They can be a bit pricier, but if you're already shelling out a couple hundred dollars on a juicer, you should do it right and get the most out of your produce- which will save you money in the long run (produce isn't cheap!). Your juice will also last longer and holds onto the maximum amount of nutrients :)

Note #2: Store your juices in air tight containers and drink them within 36-hours. As your juices oxidize, you'll lose nutrients. I store my juices in large mason jars and fill them up to the very top to minimize oxygen exposure.